
Make a Torn-Paper Bee With Your Preschooler
Plan a torn-paper bee craft for ages 3–5 with simple materials, clear steps, skill adaptations, accurate bee anatomy facts and practical safety notes.
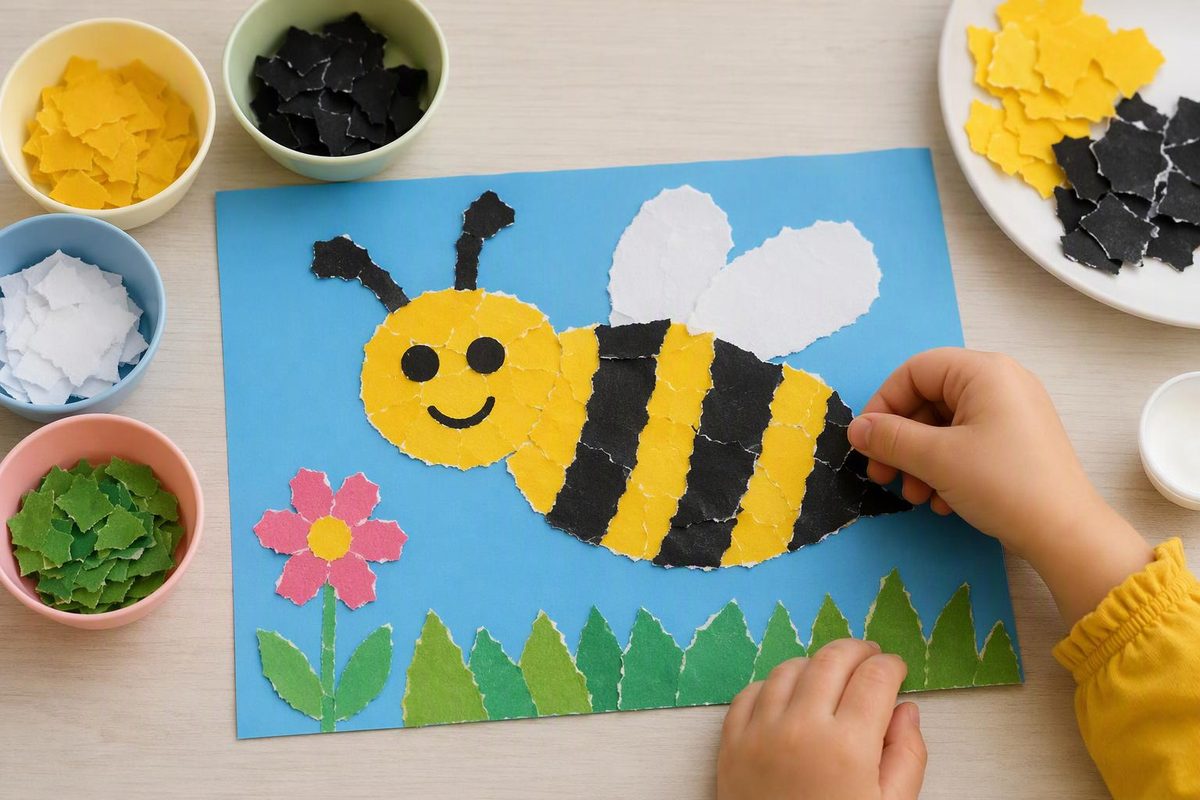
This torn-paper bee craft gives preschoolers a manageable sequence: tear, arrange, glue and draw. It works best for ages 3–5 with adult supervision, takes about 15–25 minutes plus drying time, and can be simplified with larger paper pieces or extended with counting and bee anatomy.
Choose the support your child needs; the planner will suggest a starting setup.
Bee Craft Setup Planner
Select the closest fit for your child and the materials you want to use.
Your Starting Setup
- Pre-tear large rectangles or make a short starter snip in each broad strip.
- Use a glue stick for less dripping.
- Let the child arrange the colors freely and add two large wings.
- Plan for about 15–25 minutes, plus drying time.
Source note: Adaptations follow the activity guidance above; bee anatomy is based on USDA Forest Service Bee Basics, and material setup reflects Head Start loose-parts guidance.
The activity practices pinching and tearing paper, arranging pieces, making choices, counting and descriptive language. Each bee can look different, so children do not have to reproduce an adult-made example.
Gather Paper, Glue And Drawing Tools
For each child, gather:
- One sheet of sturdy background paper
- Yellow, black and white construction paper
- A glue stick or washable school glue
- Crayons or washable markers
- Child-safe scissors, optional
- A shallow tray or bowl for paper pieces, optional
Cut or tear the yellow and black paper into broad strips before the activity if children are not yet comfortable starting a tear. A short snip at the edge of a strip can also give a child a place to begin tearing independently.
Skip googly eyes, sequins and other tiny decorations. Drawn features work just as well and leave fewer loose pieces to manage.
For added decorations, size matters. The U.S. Consumer Product Safety Commission defines a small part as an object that fits completely, without compression, inside its small-parts test cylinder. Products intended for children under 3 that present choking, aspiration or ingestion hazards because of small parts are banned, although paper articles are excluded from that particular rule. This remains useful context when younger siblings share the craft space or a child still mouths materials (CPSC small-parts guidance).
Set Up A Simple Work Area
- Put yellow and black paper strips in separate piles or shallow trays.
- Set out a few larger white pieces for wings.
- Place glue and drawing tools within reach.
- Keep a sheet of scrap paper nearby as a gluing mat.
- Show a photograph of a bee if one is available, but do not require children to copy it.
Bees are more varied than the familiar yellow-and-black picture. A USDA Forest Service guide notes that native bees come in many sizes, shapes and colors. It also describes the features bees share with other insects: a head, thorax and abdomen, six legs, two antennae and two pairs of wings (USDA Forest Service, Bee Basics).
A child can make a recognizable striped bee, invent a purple bee or work from the colors in a real bee photograph.
Build The Bee Body With Torn Paper
Ask the child to tear several yellow and black pieces. Arrange the pieces in a row on the background paper to form a long oval or rounded body.
The pieces do not need straight edges. If starting a tear is frustrating, make a short snip at the edge of each strip and let the child continue from there.
A useful opening prompt is: “Which color would you like to place first?” It gives the child control without requiring a complicated plan.
Rearrange The Stripes Before Gluing
Pause before adding glue so the child can inspect the design. The pieces can be moved, overlapped or separated by small spaces.
Use the arrangement for specific pattern and comparison language:
- “What comes after yellow?”
- “Do you notice a pattern?”
- “Which strip is widest?”
An exact alternating pattern is optional. The craft is still successful if the child groups colors, changes the pattern midway or decides not to use a pattern.
Glue One Stripe At A Time
Lift and glue one piece at a time so the arrangement does not disappear under a pile of loose paper. With liquid glue, model making a few small dots or a thin line rather than covering the entire paper. Press each piece briefly before continuing across the body.
A glue stick usually creates less dripping. If sticky fingers interrupt the work, offer a damp cloth without taking over the placement.
Add Wings, Antennae And Legs
Tear or cut two large white wing shapes and glue them near the top or sides of the body. Children who want more anatomical detail can make four wings instead.
Draw eyes and a mouth if wanted, then add two antennae with a crayon or washable marker. For a science-and-counting extension, invite the child to draw six legs.
Real bees have two pairs of wings, although a side-view picture may not show all four clearly (USDA Forest Service, Bee Basics). Treat the number of wings and legs as something to investigate, not a test the picture must pass.
Give The Bee A Place To Go
Add flowers, a nest, clouds or a flight path to the background. Ask, “Where is your bee going?” The question opens the project to storytelling and additional drawing without prescribing what the finished scene should contain.
Head Start recommends introducing a few open-ended materials at a time, using larger pieces for easier handling and cleanup, and asking questions that allow many possible answers (Head Start loose-parts guidance). For this craft, that means offering useful choices without crowding the table with decorations.
Make The Craft Easier When Needed
For a child who is still learning to tear, pre-tear large yellow and black rectangles or make starter snips in broad strips. You can also draw a large body outline to create a clear placement area.
Offer only three or four paper pieces at once if a full tray feels distracting. Use a glue stick to reduce dripping, or let the child point to the desired spot while an adult adds glue. The child can then place or press the paper independently.
These adjustments preserve the choices and hand movements at the center of the activity rather than replacing the child’s work with an adult-made bee.
Extend The Craft With Patterns And Bee Anatomy
Children ready for more detail can:
- Count six legs while drawing them.
- Compare the sizes of two wings.
- Make a repeating color pattern with the stripes.
- Label the head, thorax and abdomen with adult help.
- Add paper flowers and draw a route from flower to flower.
- Compare several bee photographs for color, hairiness or body shape.
For a longer spring theme, pair the collage with one of these planting and plant-care activities.
Supervise Materials And Clean Up Loose Pieces
Choose age-appropriate, nontoxic art materials and use them according to their labels. Supervise scissors and glue. Check the floor and table for scraps and loose decorations as the activity continues, especially if a participating child or nearby sibling still mouths objects.
Head Start advises matching loose materials to children’s ages and developmental levels, checking for choking risks and rough edges, and closely monitoring children as they begin using the materials (Head Start loose-parts guidance).
Place finished collages flat until the glue is no longer tacky. Sweep reusable scraps into a tray for another collage, then wipe glue from the table before it dries.