
Turn Little Footprints Into a Christmas Tree Keepsake
Choose one manageable format, test the layout before stamping and prepare the setup in advance. Manufacturer directions govern use, cleaning and drying.
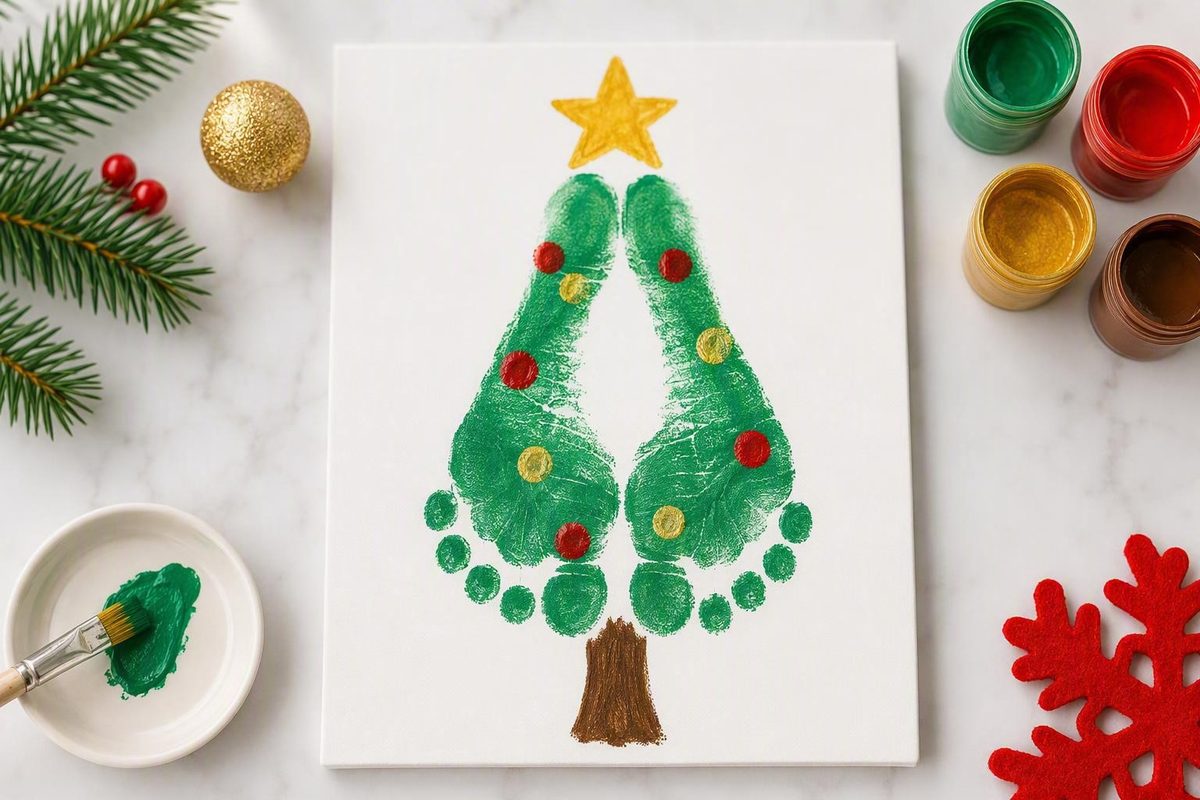
A footprint Christmas tree incorporates one or more child footprints into a holiday tree design. The print may form the entire tree, one half of a two-foot tree, or part of a larger handprint-and-footprint composition.
The most successful version starts before the child’s foot meets paint, ink, or clay. Choose a format that suits the finished use, test the available space, gather every supply, and treat printing as one brief, adult-guided step. Decorating can happen later, after the footprint has dried.
Editorial disclosure: This guide synthesizes documented craft methods and marketplace specifications. It does not imply that this specific activity has been independently tested, and it does not establish that any material or positioning method is suitable for every child. Check the current manufacturer instructions for each product you use.
Choose the right footprint Christmas tree format
Cards, canvases, clay ornaments, printables, and preprinted signs can preserve the same core details: the child’s footprint, name, and year. They differ in what you receive, what you must prepare, and how the finished craft will be used.
| Format | Final use | Preparation required | Likely mess | Customization | Drying needs | What the adult supplies |
|---|---|---|---|---|---|---|
| Single-footprint card | Mailing or hand delivery | Low to moderate | Paint or ink cleanup | Message, lights, star, name, year | Print must dry before decorating or folding | Cardstock, suitable color medium, applicator, markers, envelope |
| Two-footprint canvas or cardstock | Wall, shelf, or classroom display | Moderate | Two prints plus glue | Trunk, star, ornaments, names | Prints and attached details must dry | Surface, paint, brush, paper, scissors, glue, decorations |
| Air-dry-clay ornament | Hanging decoration | High | Clay shaping, impressions, painting | Color, baubles, star, ribbon, year | Clay must dry fully before painting | Clay, paint for dried clay, brushes, ribbon |
| Printable template | Template-based keepsake | Low to moderate | Depends on the added paint or ink | Usually name, message, colors, print placement | Added medium must dry | Printer, paper, paint or ink, applicator, finishing materials |
| Preprinted physical sign | Hanging keepsake | Low to moderate | Footprint application and cleanup | Child’s print, name, year if space permits | Added medium must dry | Suitable paint or ink and any personalization supplies not included |
Choose a card for mailing or hand delivery. A single green footprint makes a compact tree and leaves room for a message. One documented card method uses heavy cardstock, marker lights, a yellow star, and an optional envelope. It suggests 4-by-6-inch or 5-by-7-inch cardstock, provided the footprint and decorations fit the selected size in the footprint Christmas card instructions.
Choose canvas or cardstock for a larger display. In a two-footprint design, green right and left footprints sit side by side. The toes create the wider base near a paper trunk, while the heels meet near the top and a star. The larger surface can also provide room for a name, date, or surrounding decorations.
Choose clay for a dimensional ornament. This version has several distinct stages: preparing and rolling the clay, making the impressions, trimming the tree shape, creating a hanging hole, drying, painting, and adding ribbon. It is not simply a painted footprint transferred to a finished ornament.
Choose a printable when you want the surrounding design prepared for you. A printable is a digital file rather than a completed keepsake. The buyer generally remains responsible for printing, choosing paper, supplying paint or ink, applying the footprint, and finishing the project.
Choose a physical sign when you want a preprinted substrate. The documented marketplace option is a 10-by-8-inch Christmas-tree design printed on white plywood listed as 4 millimeters thick, with a hanging rope. The listing mentions handprints and footprints but does not clearly say whether paint or ink is included, so verify the package contents before beginning on the preprinted keepsake listing.
No format is universally safest, easiest, most durable, or best. Select according to the intended result—mailing, wall display, hanging ornament, template-based project, or preprinted keepsake—and the amount of preparation you want to manage.
Prepare the workspace and test the footprint layout
Printing should be the shortest part of the project. Complete as much preparation as possible before involving the child.
Master supply checklist
- Surface: Heavy cardstock, canvas, air-dry clay, a printed template, or a physical sign
- Color medium: Paint or ink whose manufacturer’s directions cover the intended surface, application, age range, cleaning method, and drying process
- Application tool: Sponge brush, paintbrush, suitable ink pad, or another applicator supported by the product instructions
- Decorations: Markers, flat stickers, a paper trunk, a foam or sticker star, painted dots, or ribbon for a completed clay ornament
- Cleanup supplies: The manufacturer-directed cleaner, washcloths, towels, a covered waste container, and clean paper on which to place tools
- Personalization materials: Signing pen, letter templates, name labels, a date or year, and a first-Christmas message if desired
Read the manufacturer’s current age, intended-use, skin-contact, washing, and drying directions. Craft sellers may recommend “child-safe” paint or ink, but that wording does not establish that a particular product is suitable for every baby or child.
As an editorial precaution, keep the printing stage adult-led and closely observed. The adult should control the wet medium, ribbon, and decorative pieces rather than assuming that every material suits independent child use. If the child becomes distressed or pulls away, stop and try another time instead of forcing the impression.
Protect the table or floor. Place the final surface, scrap paper, applicator, cleanup materials, and decorations within reach. Remove lids, unfold towels, and decide where the wet artwork will rest. You should not need to search for cleanup supplies while managing a painted foot.
Next, perform a footprint fit test:
- Trace the child’s foot on scrap paper, or make a practice print if the chosen product’s directions permit it.
- Cut out the outline.
- Position it on the card, canvas, printable, or sign.
- Check the direction of the toes and heel.
- Confirm that there is room for the trunk, star, name, year, and message.
- Add light placement guides outside the final print area if helpful.
A related handprint-tree tutorial recommends planning the layout and practicing on paper before committing to the final surface. Although it addresses handprints rather than footprints, the same approach can help identify print-craft fit and placement problems before the final impression is made.
A second adult may make the workflow easier when working with a baby or a child who wants reassurance. One adult can attend to the child while the other handles the medium and artwork. This is practical craft-management advice, not a medically validated positioning method. Do not require a baby to stand or use an unsupported position to obtain the print.
After printing, follow the selected product’s directions for cleaning the foot and tools and for drying the artwork.
Make a single-footprint Christmas tree card
For a compact card, gather:
- Paint selected according to its manufacturer’s age, use, application, and cleaning directions
- A sponge brush
- Heavy cardstock
- Fine-tip colored markers
- A signing pen or marker
- An envelope, if the card will be mailed
A 4-by-6-inch or 5-by-7-inch card may work, but test the footprint first. The surface needs room for the full print plus the star, lights, trunk, and message.
- Prepare the card. Decide whether to stamp directly onto a flat card or onto a separate piece of cardstock that will later be folded or mounted. A separate flat sheet can be easier to stabilize when a folded card rocks or shifts. This is practical workflow advice, not a requirement.
- Check the orientation. Position the traced-foot template and identify where the heel, toes, star, trunk, and message will go.
- Apply the color. Use the sponge brush to apply a thin, even coat across the underside of the foot. Use a scrap-paper print to assess the coverage rather than relying on a universal quantity.
- Guide the foot into place. An adult may need to perform the entire stamping step for a baby.
- Press without sliding. Hold the cardstock steady, make brief contact, and avoid shifting the foot sideways.
- Lift the foot away. Lift it directly rather than dragging it across the surface.
- Clean the foot. Use the method specified for the selected color medium.
- Let the print dry. Follow the paint and paper instructions before drawing or mounting anything over it.
Once the footprint is dry, draw a zigzag line across it to suggest a light string. Add colored dots as bulbs, place or draw a yellow star near the top, and add a small trunk if the design needs one. Flat light stickers are an alternative to drawing each bulb.
Finish with a holiday message, such as:
Merry Christmas from our little tree Maya · 2026
Plan the child’s name and year before writing so the text does not crowd the heel, toes, or star.
Create a two-footprint tree on canvas or cardstock
The documented two-footprint method uses an 8-by-10-inch canvas or white cardstock, green paint, a paintbrush, brown construction paper or cardstock, scissors, glue, and yellow craft foam or a flat star sticker in the original two-footprint tutorial.
The right and left green footprints are placed side by side. The toes form the wider lower portion of the tree, while the narrower heels form the top.
Before opening the paint, arrange two paper foot outlines on the canvas or cardstock. Leave room above the heels for the star and below the toes for the trunk. Check whether a name and year will fit along the side or bottom.
Apply color evenly over the first foot. A scrap-paper test is more useful than an exact paint measurement.
Stamp one foot at a time:
- Hold the final surface steady.
- Position the first foot using the paper outline as a guide.
- Press without rocking or sliding.
- Lift the foot directly away.
- Clean it according to the product instructions.
- Repeat with the second foot, keeping the heels relatively close and the toes arranged as the wider base.
Let both prints dry according to the paint and surface directions. Then cut a brown trunk approximately 1.5 inches by 1.5 inches and attach it near the toes; place the yellow star near the heels, as shown in the documented method for this canvas or cardstock layout.
Canvas and cardstock are both documented choices. Select according to the intended display and the supplies available rather than assuming that one is universally more durable or less prone to smearing.
Add the child’s name and year only after checking the complete arrangement.
Make an air-dry-clay footprint tree ornament
For this dimensional version, gather:
- Air-dry clay
- Acrylic paint for decorating the dried clay, without assuming that it is suitable for skin contact
- Paintbrushes
- Ribbon
Read the clay manufacturer’s handling, age, thickness, drying, and cleanup instructions before beginning.
One documented method starts with approximately 250 grams of air-dry clay rolled to about 1 centimeter thick. It uses two footprint impressions and trims the surrounding clay into a tree shape in the air-dry-clay ornament tutorial.
- Knead the clay. Prepare it according to the product directions.
- Roll an even slab. Use the tutorial measurement as an approximate reference, but let the clay instructions control.
- Plan both impressions. Position paper foot outlines to confirm that both prints will fit within a tree-shaped border.
- Press the first foot gently into the clay. Aim for a visible impression without pressing through the slab.
- Lift the foot away carefully. Avoid twisting or pulling the surrounding clay.
- Repeat with the second foot.
- Add optional thumbprint baubles. Include this step only if the material instructions permit the intended handling and the adult can manage the process closely.
- Trim the tree shape. Remove excess clay while leaving enough material around the impressions to support the ornament.
- Create the hanging hole. Use the end of a paintbrush before the clay dries. Do not place the hole where the surrounding edge is visibly thin.
- Leave the ornament to dry fully.
The tutorial reports a drying estimate of 24 to 48 hours. Actual readiness depends on the clay instructions, slab thickness, and room conditions, so the manufacturer’s directions should determine when the ornament can be painted rather than the tutorial estimate alone.
Once fully dry, paint the area outside the footprints white and the impressions green. Fill the thumbprint baubles with different colors, add a star, and let the decorative layers dry as directed. Thread ribbon through the prepared hole only when the ornament is ready to handle.
The documented method does not establish whether a sealant is needed or identify a compatible product. Do not prescribe or apply a coating without suitable instructions from the clay and paint manufacturers. The available evidence also does not establish that the ornament is crack-resistant or appropriate for unsupervised handling.
Use a printable template or ready-to-decorate sign
Before buying, determine whether the listing is for a digital download or a physical product. A preview image of completed footprint artwork does not necessarily mean that paper, paint, framing, or a finished keepsake will arrive.
One documented Etsy printable provides an editable PowerPoint file, a print-ready PDF, and a Google font file for an 8.5-by-11-inch design. The seller advises exporting an edited PowerPoint file as a PDF before printing to preserve alignment. Its stated license permits unlimited personal, noncommercial printing but prohibits sharing or selling the files and selling printed items made from them under that specific Etsy listing.
A second documented reindeer-and-tree printable includes A4 and 8-by-10-inch JPG files. Its seller recommends printing at 100% scale rather than selecting “fit to page,” which can alter the intended dimensions. The seller also recommends 200-to-300-gsm matte cardstock, warns that ordinary paper may wrinkle under wet paint, and notes that glossy card may smudge. Its stated terms permit multiple personal-use copies but prohibit sharing, selling, or distributing the files and prints under that specific template listing.
For either printable:
- Download and inspect all included files.
- Edit only in a supported format.
- Export or print according to the seller’s directions.
- Produce one test copy.
- Confirm the scale with a ruler if the dimensions matter.
- Place a traced-foot outline over the design.
- Check the footprint orientation and personalization space.
- Print the final copy on the selected paper.
- Apply the footprint using separately purchased supplies.
A preprinted physical sign is different. It arrives as a substrate rather than a digital file. Before beginning, verify whether the package includes a color medium; the documented listing does not clearly establish that paint or ink is supplied.
Prices, inventory, delivery conditions, and license terms can change. Review the individual listing when purchasing. Sparse marketplace ratings are not sufficient evidence that a product is broadly reliable or high quality.
Decorate and personalize the finished tree
Decorate in layers so the identifying footprint remains visible.
First layer: trunk and star
Position the structural elements before adding smaller decorations. Options include:
- Brown marker trunk
- Brown paper or cardstock trunk
- Painted trunk
- Yellow foam star
- Flat star sticker
- Painted or drawn star
Temporarily place paper pieces without glue, then inspect the overall balance. The trunk should not conceal the defining toe area, and the star needs enough room above the heel.
Second layer: lights, garland, and baubles
Flat decorations can preserve the footprint’s outline:
- Fine-marker light string
- Zigzag garland
- Colored marker bulbs
- Painted dots
- Flat light stickers
- Thumbprint baubles on clay, subject to appropriate material instructions and adult management
Thumbprint baubles can record another child print, but they are optional. An adult can add painted dots after the footprint has dried instead.
Third layer: name, message, and year
Plan the lettering before writing or painting directly on the keepsake. One documented method uses a paper template matching the available open space. Each letter is cut out and positioned beside the footprint, with the middle letters completed first so the spacing can be adjusted outward in the name-layout method.
Possible identifying lines include:
- Noah · Christmas 2026
- Ava’s First Christmas
- Our Little Christmas Tree
- Preschool Room 2 · December 2026
A name, date, or first-Christmas message provides identifying context. Its emotional significance is personal rather than an objective property of the craft material.
For siblings, make a separate tree for each child, place two footprints side by side, or arrange several labeled trees on a larger surface. One related family design arranged children’s prints from larger to smaller and substituted a baby’s footprint when a handprint was impractical. Use that only as inspiration for a multi-child arrangement because the original project is primarily a handprint tree rather than a footprint-only design.
Other variations use a brown footprint as the trunk and green handprints as the foliage. Identify these clearly as handprint-and-footprint combinations rather than substitutes for a footprint-focused tree.
If you want to avoid loose dimensional accessories, use markers, paper shapes, flat stickers, or painted details. Do not assume that pom-poms, glitter accessories, ribbon, or foam pieces are appropriate for independent use by every child.
Prevent and address common footprint-craft problems
A practice print can reveal fit, placement, and coverage problems before the final impression. If the finished print is imperfect, preserve what remains recognizable rather than trying to make it look machine-printed.
| Problem | Likely craft-stage cause | Prevention | Bounded recovery option |
|---|---|---|---|
| White gaps or faint areas | Uneven color coverage or incomplete contact | Check coverage with a scrap-paper print | Keep the natural variation, or add a small flat ornament without covering defining details |
| Missing toes | Toes did not contact the surface evenly | Stabilize the surface and guide the contact | Outline a faint toe only if the result still represents the print honestly; otherwise leave it as made |
| Blurred edge or doubled print | The foot or surface shifted | Hold both steady and lift without sliding | Crop and mount the usable area, or begin again |
| Poor alignment | Placement was not mapped before stamping | Use traced-foot cutouts or a practice print | Move the star or trunk to suit the actual print |
| Wet, overloaded print | Too much medium was applied for the foot and surface | Test the application on scrap paper | Stop before the final stamp, adjust the application, and test again |
| Buckled paper | The paper reacted to wet paint | Use paper suited to the selected medium; one seller recommends heavier matte cardstock | Let it dry flat if the material permits, or crop and mount the usable print |
| Glossy-surface smudging | The medium and surface were incompatible or handled too soon | Check the paper and color-medium directions | Reprint on a compatible surface if the license permits |
| Printable stamped incorrectly | The foot slipped, the scale changed, or the layout was not tested | Print a trial copy and use a traced-foot overlay | Print another personal-use copy only when the exact license allows it |
| Stray mark | Paint transferred during movement or cleanup | Keep clean and wet areas separate | Cover a small peripheral mark with a flat ornament, label, or paper star |
| Flawed clay impression | The foot twisted or the soft clay distorted | Plan placement and lift carefully | Reshape and retry before drying if the clay instructions permit it |
Do not repeatedly press a paint-covered foot onto the final surface in an attempt to repair an overloaded impression. Stop, clean up, adjust the application, and test again on scrap paper.
For a printable mistake, consult the exact license rather than assuming that every download permits unlimited reprinting. The two documented products allow repeat personal copies, but those terms do not automatically apply to other templates.
If a paper print is recognizable but awkwardly positioned, crop it into a rectangle or oval and mount it on a larger folded card. This will not restore the original arrangement, but it can preserve the usable footprint.
For clay, decide whether to reshape and retry while the material remains workable. The supplied evidence does not establish that a fully dried impression can be repaired reliably.
The goal is a recognizable record of the child’s footprint, not a guaranteed studio-quality image. Uneven toes and slight variations can remain part of the finished craft.
Adapt the activity for babies, preschoolers, and groups
Separate the brief footprint-making stage from the longer decorating stage. The child does not need to remain involved while the adult draws lights, cuts a trunk, or writes the message.
For babies
Prepare the complete workspace first and make the printing stage adult-led. Use a position that the responsible adult can manage without forcing the baby to stand or attempting unsupported placement. Another adult may assist with the workflow, but this should not be presented as medical or developmental positioning advice. Clean the foot according to the product directions and decorate the artwork later.
For toddlers
Let the adult manage application, surface placement, stamping, and cleanup. After the print dries, the child can choose colors or indicate where a flat star or sticker should go, when that participation fits the child and the materials.
For preschoolers
They might choose the star and trunk, suggest marker-light colors, arrange paper decorations before gluing, or decide where the name and year belong. The adult should continue to oversee the wet medium, footprint application, and cleanup.
For a group or classroom
Organization matters more than speed:
- Label every card or surface before opening the paint.
- Confirm that each child’s footprint fits the selected format.
- Establish separate clean, printing, drying, and decorating areas.
- Bring one child to the printing area at a time.
- Complete that child’s print and cleanup before beginning the next.
- Move wet work to a labeled drying space.
- Decorate only after the applicable drying period.
A related handprint project describes completing all prints in one color before switching colors to reduce repeated cleaning. That can inspire an assembly-line arrangement, but classroom procedures and product-specific directions should take priority over speed when adapting the method for a group.
Cards are a practical group format because each child receives a labeled individual surface. A larger canvas can support a collaborative display with multiple footprint trees. If the design combines hands and feet, identify it as a related variation rather than a footprint-only project.
Do not attach therapeutic, sensory, developmental, or fine-motor promises to the activity. It can simply be an adult-guided seasonal craft in which children participate at a manageable level.
Before finishing, use this compact adult checklist:
- Confirm the material’s age, intended-use, cleaning, and drying instructions.
- Test the footprint against the available space.
- Prepare the surface, tools, cleanup supplies, and decorations.
- Oversee the brief printing step.
- Clean the foot and workspace as directed.
- Allow the print or clay to dry fully.
- Add the child’s name, year, and message.
Frequently asked questions
Should I use one footprint or two for a footprint Christmas tree?
Use one footprint for a compact card or a design in which one green print represents the whole tree. Use two footprints for a wider composition, with the prints side by side, the toes forming the base, and the heels forming the top.
The choice depends on the available space and desired appearance. Test one or two traced-foot cutouts before applying paint. A small card may fit only one print, while a larger canvas or cardstock sheet may accommodate two.
What paint or ink should I use on a baby’s or preschooler’s foot?
Use only a product whose current manufacturer instructions cover the intended age, application, surface, cleaning method, and skin-contact situation. Do not infer direct-skin suitability from a general “non-toxic” label or from a tutorial’s use of a particular paint.
If the instructions do not clearly address the intended use, choose another footprint method or ask the manufacturer for clarification. This article does not endorse a specific paint or ink as suitable for every child.
How long does an air-dry-clay footprint ornament need to dry?
The documented tutorial estimates 24 to 48 hours, but that is not a universal drying time. The clay manufacturer’s directions, the ornament’s thickness, and room conditions should determine when it is ready.
Do not paint or add the ribbon until the clay has dried according to those instructions. Paint and any later decorative layers also require their own drying periods.
Is a footprint Christmas tree printable a physical product, and can I print it again after a mistake?
The documented printables are digital downloads, not shipped physical crafts. The buyer normally supplies the printer, paper, paint or ink, applicator, and finishing materials.
The two evidenced licenses permit multiple personal-use copies, which can allow another print after a mistake. This is not a universal rule: read the exact license before reprinting, using a template in a classroom, distributing copies, or altering the file.
Can I sell finished crafts made from a purchased footprint template?
The documented Etsy listing prohibits selling printed items made from its files under its stated personal-use license.
The documented reindeer-and-tree template separately prohibits selling or distributing its files and prints under that seller’s stated terms. These restrictions apply to the named listings and may change; they should not be generalized to every template.
A license that permits repeat personal printing does not automatically authorize commercial production. If the current listing is unclear, request written clarification from the seller before offering finished crafts for sale.
A card, canvas, clay ornament, printable, or sign can preserve the same identifying details: the child’s footprint, name, and year. Choose one manageable format, test the layout before stamping, prepare the entire setup in advance, and follow each material manufacturer’s use, cleaning, and drying directions. No single version should be presented as universally safest, easiest, or most durable.