
Make G Visible With 12 Playful Preschool Crafts
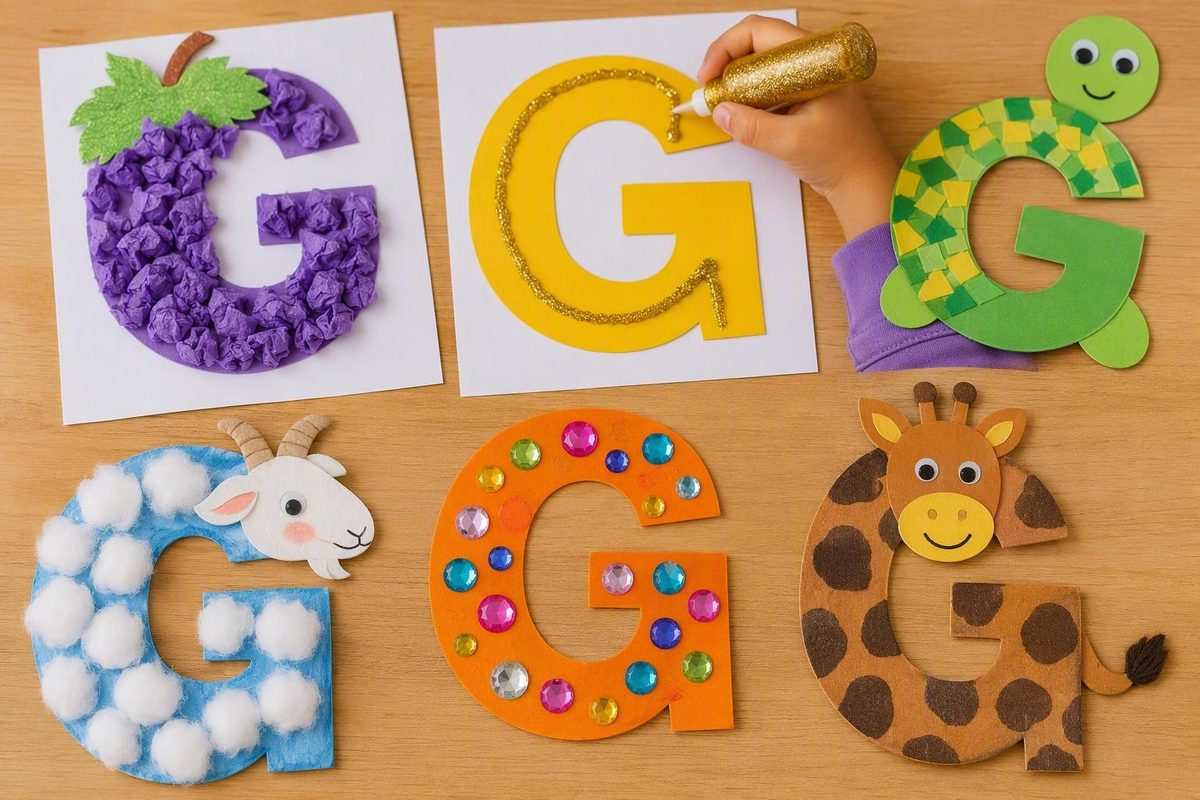
The most useful Letter G crafts for preschoolers keep the letter itself in view. A child might trace glitter glue along a G, cover a g with paper grapes, or turn a block G into a giraffe. In each case, the finished project gives the adult an obvious letter to name, point to, and revisit.
The 12 projects below include materials, directions, adult-preparation notes, no-scissors options, and alternatives to loose glitter, small decorations, and food. Choose materials for the individual child and setting rather than assuming that every preschool craft supply is suitable for every child.
Editorial note: Total Preschool says its coverage draws on 11 years of pre-K teaching experience. These projects were compiled and reviewed from the cited activity guides; this article does not claim that every project was tested by Total Preschool. Read more about our preschool teaching experience.
Choose a Letter G Craft That Fits the Child and the Setting
Start with the teaching purpose. If you want the child to notice the letter’s shape, choose a project built directly on G or g. If you want conversation, storytelling, or pretend play, a goose, ghost, or pair of glasses may fit—but add a visible letter so the project does not become only a G-themed picture.
| Project | Is the letter visible? | Letter focus | Main actions | Preparation to expect |
|---|---|---|---|---|
| Glitter G | Yes; the letters are traced | Uppercase G and lowercase g | Tracing, decorating | Draw two large outlines; allow glue to dry |
| Green collage G | Yes; materials cover a G | Either or both | Collage, sorting by color | Draw a bubble letter; prepare collage pieces |
| Grass G | Yes; paper grass covers a G | Usually uppercase G | Tearing, collage, supervised snipping | Draw the letter; precut or fringe strips |
| Garden G | Yes; flowers decorate a G | Usually uppercase G | Stickers, painting, stamping | Cut or draw a cardstock G; set out paint sparingly |
| Grapes | Yes when stamped inside a letter or built on lowercase g | Either; especially lowercase g | Stamping, collage | Draw the letter; cut a leaf and stem |
| Gumball G | Yes; G forms the machine | Uppercase G, with optional G/g matching | Stickers, matching, counting | Draw and cut a bubble G, top, and base |
| Goose | Yes in the letter-shaped version; add one to a plate goose | Uppercase G | Coloring, arranging, collage, storytelling | Draw or print a G; precut body parts if needed |
| Giraffe | Yes when made from a block G | Uppercase G | Collage, drawing, painting | Draw and cut a yellow G and head |
| Ghost | Only if added deliberately | Either | Cutting, drawing, collage | Draw or precut a ghost and cutting lines |
| Glasses | Only if added deliberately | Either or both | Decorating, construction, pretend play | Cut frames and arms; allow glue to dry fully |
| Goldfish | Yes in the G-shaped version; add one to a handprint fish | Usually uppercase G | Handprint painting, fingerprinting, collage | Prepare paper features and protect the table |
| Gingerbread | Only if written on the figure or mounting page | Either or both | Drawing, cutting, counting, pretend play | Trace figures on paper bags; precut if needed |
The glitter, green, grass, and garden projects are built directly on a letter. The letter-based grape collage, uppercase-G goose, block-G giraffe, gumball machine, and G-shaped goldfish also keep G visible. A generic ghost, goose, giraffe, pair of glasses, handprint goldfish, or gingerbread figure remains a G-themed craft unless an adult deliberately adds a G or g. Neither format is inherently better; they simply serve different purposes.
All 12 ideas can be made without a printer. Draw a bubble G for the collages, trace hand-drawn letters with glitter glue, stamp grapes inside a G, or build a gumball machine from simple geometric shapes. Paper-plate geese, paper ghosts, cardstock glasses, handprint goldfish, and paper-bag gingerbread figures are also straightforward no-print choices.
A printable can reduce the need to draw a neat letter, but it does not necessarily eliminate preparation. Access conditions also vary. One reviewed Letter G set was sold as a paid printable product rather than offered as an unrestricted download (Early Learning Ideas’ Letter G craft set). A separate uppercase-G goose template was offered through an email request form (Life Over C’s uppercase G goose template). Another grape resource displayed “Free Download” language while also directing users to log in with a membership (Twinkl’s G-is-for-grapes resource). Check current access terms before planning around any printable.
Prepare the Materials and Safer Adaptations
A reusable Letter G craft box can cover nearly every project in this guide. Gather:
- Construction paper and heavier cardstock
- Clean brown paper bags
- Paper plates
- Crayons, washable markers, or pencils
- Washable paint and brushes
- Glue sticks or liquid school glue
- Child-safe scissors
- Tissue paper and paper scraps
- Large stickers or dot stickers
- Craft sticks
- Cotton balls, clean lids, pencil erasers, or another adult-selected stamping tool
- A washable table covering, paint tray, and smock
- Optional glitter glue or glitter paper
The adult’s work begins before the glue comes out. Draw or print large letters, cut complex outlines, and prepare broad strips that are easy to hold. Set out only the paint, glue, and collage pieces needed for the current step. This keeps the choices visible without burying the child’s workspace.
If the child is not ready to cut, preserve the meaningful parts of the activity. Offer:
- Precut letters and picture components
- Paper that can be torn rather than cut
- Stickers that can be peeled and placed
- Crayons or markers for adding details
- Stamping instead of cutting circles
- Loose pieces the child can arrange before an adult secures them
For early snipping, prepare wide paper strips so the child only needs to make a single cut across each strip rather than navigate a complicated outline. One commercial Letter G guide recommends strips about one inch wide for beginning practice, but the adult should adjust the material and width to the child’s grip and scissors.
Small craft objects are optional. Large paper circles can stand in for buttons, beads, pom-poms, cereal, candy, or plastic eyes. Draw eyes with a marker, replace pipe cleaners with wide paper strips, and use paper decorations instead of food.
Use glitter glue or strips of glitter paper when you want sparkle without using loose glitter. If glitter materials do not fit the space or child, bright crayons, metallic-looking paper, or ordinary colored paper work just as well.
Several source activities involve scissors, clothespins, pipe cleaners, paint, glue, or loose decorations. Treat those materials as adult-managed choices, not as requirements. Consider the individual child’s handling of tools and loose items, the group size, the workspace, and how closely the activity can be monitored. Supervision does not make every material a suitable choice in every setting.
Before using food as a craft material, consider allergies, dietary rules, hygiene policies, the size and texture of the food, mouthing behavior, and unnecessary food waste. Every tutorial below works with paper instead. For circular “gumballs,” “grapes,” or gingerbread decorations, use large paper circles, drawn shapes, or stickers.
Four Letter-Shaped Collages: Glitter, Green, Grass, and Garden
These four projects keep G visible from the beginning. Use heavy paper so the page is less likely to curl under glue, paint, or collage materials.
1. Glitter G
Materials
- Heavy paper or cardstock
- Thick marker
- Glitter glue
- Optional crayons, markers, or glitter-paper strips
Adult prepares: Draw a large uppercase G and lowercase g side by side. Make each line broad enough for the child to follow. Open or test the glitter glue and cover the work surface.
Child does: First, trace each letter with a finger. Then squeeze glitter glue along the outlines. The glue line does not have to be exact; the aim is simply to keep returning attention to the letter’s path. The child can choose one color for each form or combine colors.
Say, “This is uppercase G. This is lowercase g.” When the glue is dry, invite the child to find each form again. The child can also dictate a caption: “G is for glitter.”
For a glitter-free version, trace the letters with crayons or markers. Another option is to attach short strips of glitter paper along the outlines. Published directions also describe placing uppercase and lowercase G on heavy paper and tracing them with glitter glue (HeroCore Learning’s Letter G craft collection).
2. Green Collage G
Materials
- Cardstock
- Thick marker
- Glue
- Green construction paper, tissue paper, fabric scraps, or stickers
- Crayons for optional drawings
Adult prepares: Draw one large bubble G, or put uppercase G and lowercase g on separate sheets. Cut large fabric or paper pieces if needed. Use broad paper shapes or stickers instead of defaulting to beads, gumdrops, or other small objects.
Child does: Tear paper, select textures, and place green pieces inside the letter. The child can cover the G completely or leave some of the background showing. They might add green drawings around it: grass, a garden, grapes, or a green monster.
Before gluing, ask, “Can you find the opening in the G?” Afterward, trace around the outside and inside edges together. If you make both forms, compare them without requiring the child to reproduce either one.
For a reusable version, draw the letter on cardboard or place a paper G inside a clear sleeve. The child can arrange materials without glue, clear the mat, and build it again. Bubble letters can be drawn by hand, traced from a sturdy pattern, or printed, depending on the adult’s preferred preparation method (alphabet collage preparation ideas).
3. Grass G
Materials
- Cardstock with a large uppercase G
- Green tissue paper or construction paper
- Glue
- Child-safe scissors, if appropriate
- Crayons or paper flowers for optional additions
Adult prepares: Draw and, if desired, cut out a large uppercase G. For a no-scissors version, prepare strips of tissue paper that the child can tear. For supervised snipping, cut wide construction-paper strips and draw a stopping line so the cuts create fringe without separating the strip.
Child does: Tear tissue into grassy pieces or make short snips along the prepared strips. Glue the grass across the G. Let the blades point in different directions; an uneven “lawn” still preserves the child’s choices.
Ask the child to run a finger along any uncovered part of the G. Prompt a short phrase such as “G is for green grass.” The child can add flowers, insects, clouds, or a sky around the letter.
4. Garden G
Materials
- A cardstock G
- Flower stickers or paper flowers
- Washable paint
- Paintbrush
- Pencil with an intact eraser
- Markers or crayons
Adult prepares: Draw and cut a large G, or leave it on the full sheet if removing the outline would make the letter difficult to recognize. Set out a small amount of washable paint. If using the stamping method, check the pencil before the activity and manage the tool closely.
Child does: Choose between two approaches:
- Place flower stickers or paper flowers on the G.
- Paint stems with a brush, then press a pencil eraser into paint and stamp flower heads.
The child chooses the colors, placement, and number of flowers. There is no need for every garden to match a model. Ask, “Where can you still see the G?” Finish with a dictated sentence such as “G is for my garden.” Pencil-eraser flower stamping and painted stems appear in a broader collection of Letter G activities (ABCmouse’s garden activity).
Grapes and Gumballs: Stamping, Stickers, and Letter Matching
These projects combine a visible letter with circles that can be stamped, glued, sorted, named by color, or counted. Treat counting and color prompts as optional extensions rather than required outcomes.
5. Grape-Print G
Materials
- White or light-colored cardstock
- Purple washable paint
- A cotton ball held in a clothespin
- Green construction paper
- Glue
- Marker
Adult prepares: Draw a large uppercase G or lowercase g. Cut a large green stem and leaf. Pour a shallow amount of purple paint into a tray, then place a cotton ball in a clothespin to make the stamper. If that tool does not fit the child or setting, select one larger round stamping tool instead.
Child does: Dip the stamper lightly into paint and make purple circles on or inside the letter. Add the paper stem and leaf once the prints are complete. Let the page dry before displaying it.
Say “grapes” slowly and emphasize its hard G at the beginning. Invite the child to find the G beneath or around the prints. Optional prompts include naming colors, predicting where the next print will go, or counting a small group of circles.
A different grape-print method uses a clean milk-cap lid as the round stamper (Reach All Readers’ Letter G projects). Select one stamping method before beginning rather than combining inconsistent tools in the directions.
Paper-only variation: Cut large purple circles and glue them along a lowercase g. Add a green stem and leaf. If you want a curled vine, use an adult-selected pipe cleaner or substitute a curled strip of green paper. Let the child arrange the pieces before the adult adds or helps with glue.
6. Gumball G
Materials
- Cardstock in several colors
- Marker
- Scissors
- Glue
- Large colored paper circles or dot stickers
Adult prepares: Draw and cut a broad bubble G. Cut a semicircle for the top and a trapezoid for the base. These simple hand-drawn shapes remove the need for a purchased or account-gated template. Prepare large circles, or set out dot stickers if peeling them fits the child.
Child does: Fill the G with colored “gumballs,” then attach the semicircle and trapezoid so the G becomes the center of the machine. The child can select colors freely, make a pattern, or place circles without a pattern.
For uppercase-and-lowercase matching, write G and g on the stickers or paper circles. Ask the child to place uppercase forms on one side and lowercase forms on the other, or alternate them while you name each form. A published version uses a bubble G, semicircle, trapezoid, and G-labeled dot stickers in this arrangement (ABCDee Learning’s gumball G setup).
Optional extensions include counting a selected group of circles, finding two of the same color, or comparing two groups. Keep the prompt conversational; the craft does not need to become a worksheet.
Goose and Giraffe: Two G Animals With Different Sounds
Goose and giraffe both begin with G, but they do not begin with the same sound. Goose starts with the hard G heard in grapes and garden. Giraffe starts with soft G. Preschoolers do not need a long phonics explanation: “G can make more than one sound” is enough here.
7. Goose
Uppercase G Goose
Materials
- Cardstock or construction paper
- Marker or a printed uppercase G
- Paper for the head, beak, wing, legs, and feet
- Crayons
- Glue
Adult prepares: Draw or print a large uppercase G. Cut it out if the finished shape will remain sturdy. Draw and precut the smaller body pieces for a child who is not ready to use scissors.
Child does: Color the G and body parts. Arrange the head, beak, wing, legs, and feet before gluing so the uppercase letter remains recognizable. Draw the eye instead of requiring a plastic eye. The child can add water, grass, eggs, or a nest to the background.
Point to the base letter and say, “This goose is built on uppercase G.” A printable version likewise asks children to color, arrange, and attach the pieces and suggests adult precutting for children who are not ready for scissors.
Paper-Plate Goose
Materials
- Half a paper plate
- Construction paper
- Glue
- Marker
- Optional large paper feathers or adult-selected craft feathers
Adult prepares: Cut the plate in half and prepare a neck, head, beak, wing, legs, and feet. Write a large G on the plate or prepare a “G is for goose” mounting page.
Child does: Arrange and glue the pieces onto the plate half, then draw an eye. Add large paper feathers if desired. Without the added G or labeled mounting page, this remains a goose-themed craft rather than a letter-shaped one.
After it dries, use the goose as a storytelling or song prop. It can also become one page in a homemade alphabet book.
8. Giraffe G
Materials
- Yellow cardstock
- Orange or brown paper
- Marker
- Glue
- Optional washable finger paint
Adult prepares: Draw and cut a thick yellow block G and a simple giraffe head. Cut large paper circles or irregular spots. Use paper spots rather than buttons when loose pieces do not fit the setting.
Child does: Glue or paint spots on the G, attach the head, and draw a face, horns, legs, and perhaps a tail. The child decides whether the spots are round, long, crowded, sparse, one color, or several colors.
For the painting variation, use washable paint for fingertip spots if direct contact with paint fits the child and activity space. The adult dispenses the paint and prepares for cleanup.
Say, “Giraffe begins with G, but its G sounds different from the G in goose.” Mount the finished giraffe in an alphabet book or invite the child to dictate a short story about where it is going.
Ghost, Glasses, and Goldfish: Cutting, Construction, and Pretend Play
These projects offer different ways to participate: cutting along visible paths, decorating something wearable, and painting with hands or fingers. Keep the Letter G connection explicit by writing or building the letter into each design.
9. Ghost Cutting Craft
Materials
- White paper
- Dark marker
- Child-safe scissors
- Crayon or marker
- Contrasting mounting paper
- Glue
Adult prepares: Draw a broad ghost shape. Inside or along its lower edge, add several cutting paths: straight, gently curved, wavy, zigzag, or stepped. Keep the paths widely spaced. Add a large G to the ghost’s body or prepare a page labeled “G is for ghost.”
Child does: Draw a face and decorations, then cut on selected lines while an adult monitors the activity. There is no need to complete every type of line. Glue the ghost to the mounting page and trace the added G with a finger.
For a child who is not ready to cut, provide a precut ghost. The child can draw the lines as decorations, add stickers, or arrange paper shapes for an adult to secure.
10. Glasses
Materials
- Cardstock or thin cardboard
- Marker
- Child-safe scissors
- Glue
- Two craft sticks
- Crayons, stickers, or large paper shapes
Adult prepares: Draw and cut a glasses frame with two large openings. Cut two cardstock arms or provide craft sticks. Write G on one lens area and g on the other, or add “G is for glasses” across the top.
Child does: Color the frames and add large paper decorations or stickers. Help attach the arms. Set the glasses aside until every glued joint is fully dry before using them for pretend play.
One published version recommends leaving glued craft-stick glasses to dry overnight before wear (ABCmouse’s glasses directions). Actual drying needs depend on the glue, cardboard, and amount used, so inspect the joins rather than relying only on the clock.
For a no-cutting version, the adult prepares the entire frame. The child can color it, place decorations, and point to uppercase G and lowercase g. Treat the finished glasses as a pretend-play prop rather than protective eyewear.
11. Goldfish
Orange Handprint Goldfish
Materials
- Washable orange paint
- Paper
- Blue washable paint, if appropriate
- Paper or marker for the eye and mouth
- Smock and table covering
Adult prepares: Protect the work surface, set out limited paint, and have washing supplies ready. Decide whether hand and fingertip painting fit the child and setting.
Child does: Press an orange-painted hand onto the paper with fingers spread to suggest fins or a tail. Add a drawn eye and mouth. Blue fingerprints can become bubbles. Write a large G beside the fish or mount it on a page labeled “G is for goldfish.”
Construction-Paper G Goldfish
Draw and cut an orange uppercase G, then turn it into a fish with a paper tail, fins, and drawn face. This version keeps the letter inside the final image and avoids direct paint contact.
Say “ghost” and “goldfish” together, briefly emphasizing the hard G at the beginning of each. Then return attention to the project: Where will the fish swim? What could the child draw in the water?
Gingerbread Figures: A Seasonal, Food-Free G Craft
12. Gingerbread Figures
Materials
- Clean brown paper bags
- Gingerbread-person stencil or a hand-drawn outline
- Crayons, markers, or pencils
- Scissors
- Paper scraps and glue, if desired
- Mounting paper
Adult prepares: Open the paper bags flat and draw gingerbread figures. An adult can cut them out, or a child who is ready can cut the simple outline with adult attention. Prepare large paper shapes for decorations; candy is unnecessary.
Child does: Add a face, clothing, patterns, and a visible uppercase G or lowercase g to each figure. Alternatively, mount the completed figures on a page titled “G is for gingerbread.” Let the child decide whether the figures match or each looks different.
Keep the activity food-free with drawn icing lines, paper-circle “buttons,” paper bows, and colored-pencil patterns.
Optional prompts include:
- Count the completed figures.
- Compare two figures’ colors or patterns.
- Arrange them by a child-selected attribute, such as “striped” and “not striped.”
- Tell a story about the gingerbread figures.
- Find the G or g on each figure.
These are opportunities to add conversation, comparison, or counting—not promises that the craft will produce a particular learning outcome. Brown-paper-bag figures and optional counting or comparison prompts appear in published Letter G directions (HeroCore Learning’s gingerbread activity).
For a no-scissors version, provide one adult-precut figure and drawing tools. Gingerbread begins with a soft G, unlike grapes, goose, garden, ghost, and goldfish.
Turn One Craft Into a Short Letter G Learning Routine
A Letter G activity does not need to become a long lesson. Use a simple sequence:
- Show both forms. Point to uppercase G and lowercase g.
- Name the project word. Say “G is for grapes,” “G is for goose,” or another relevant phrase.
- Make the project. Keep adult directions brief and leave room for choices.
- Return to the letter. Find, trace, match, or name G on the finished work.
For a straightforward beginning-sound comparison, use hard-G words such as grapes, goose, goat, garden, and gumball. Then add one concise contrast: “Giraffe—or gingerbread—also begins with G, but this G sounds different.” Do not present giraffe as though it begins with the same sound as goose.
Choose one follow-up rather than trying to use them all:
- Sort pictures or spoken words by hard and soft G.
- Look for printed G or g around the room.
- Invite the child to dictate a “G is for…” sentence.
- Count selected craft elements.
- Tell a short story with the goose, ghost, glasses, or gingerbread figure.
- Add the project to a homemade alphabet book.
For a group, draw and cut shared materials in advance. Place paper, glue, paint, and stickers in small working quantities. Even when every child starts with the same letter, preserve meaningful choices in color, texture, placement, facial features, and background drawings. Identical products are not necessary.
For children with emerging motor skills, enlarge the letter and every component. Use stickers, torn paper, broad crayons, precut shapes, and drawing in place of small decorations or complex cutting. The adaptation should preserve participation: the child can choose, arrange, stamp, color, or dictate even when an adult handles scissors or final attachment.
Crafts create an occasion to notice, name, and discuss G. The available activity guides do not establish that any one craft produces a particular literacy, memory, or motor outcome. Treat the craft as one brief experience alongside conversation, books, songs, environmental print, and repeated opportunities to encounter letters.
Letter G Craft FAQs
Which Letter G crafts need no printable?
All 12 can be made without a printable. Hand-draw large G and g outlines for the glitter, green, grass, garden, grapes, gumball, goose, giraffe, and G-shaped goldfish projects. Draw a ghost, cut glasses from cardstock, make a handprint goldfish, or trace a gingerbread figure directly onto a brown paper bag.
A printable may make a letter or picture more uniform, but it can also add printing, cutting, login, email, payment, or third-party navigation requirements. Simple bubble letters and geometric shapes are sufficient.
What is the easiest way to adapt a Letter G craft for a child who cannot use scissors yet?
Have an adult precut the main letter and any complex components, then give the child jobs that still affect the finished work: tearing paper, peeling stickers, stamping paint, coloring, choosing pieces, and arranging them before an adult secures them.
Use fewer, larger pieces rather than many small ones. For example, a child can place five broad purple paper circles on a lowercase g, decorate a precut goose, or cover a large G with torn green paper.
Which crafts include both uppercase G and lowercase g?
The glitter G places uppercase G and lowercase g side by side. The green collage can use one sheet for each form. The gumball machine can include both forms on stickers or paper circles for matching. Gingerbread figures and glasses can also display one form on each side or figure.
The grape project is especially useful for lowercase g, while the grass, garden, goose, giraffe, gumball, and G-shaped goldfish projects usually begin with uppercase G. Any of them can include the other form on the mounting page.
What is the difference between the G sound in goose and giraffe?
Goose begins with hard G, the sound also heard at the beginning of grapes, garden, goat, gumball, ghost, and goldfish. Giraffe begins with soft G, as does gingerbread.
For preschool practice, keep the explanation short: “Both words begin with the letter G, but G can make different sounds.”
What can replace glitter, googly eyes, buttons, beads, or food in preschool crafts?
Use substitutions that preserve the visual idea without depending on the original object:
- Replace loose glitter with glitter glue, glitter paper, metallic-looking paper, crayons, or markers.
- Replace plastic eyes with drawn eyes or large paper eyes.
- Replace buttons, beads, pom-poms, and cereal pieces with large paper circles or stickers.
- Replace candy and other food decorations with paper shapes or drawn details.
- Replace a pipe-cleaner vine with a curled strip of paper.
No substitution is universally suitable. Adults should consider the individual child, the activity space, sensory preferences, mouthing behavior, dietary or allergy requirements, and how the selected materials will be managed.
You do not need to attempt all 12 projects. Choose one craft that keeps G visible, uses materials appropriate for the child and setting, and allows meaningful participation without requiring everyone to produce the same result. A hand-drawn G, common paper supplies, and a few thoughtful substitutions are enough. Match the letter shape and motor demands to the child, name the relevant G sound accurately, and leave room for the child to choose colors, textures, placement, and details.